前言
Cocos2dx有很多Effect可以用,像是Shaky3D、Wave3D、Lens3D等...這次我應用Ripple3D來作一個觸碰胸部就會抖動的應用。
環境
作業系統:Windows 7, 32位元
Cocos2dx版本:2.2.0
開發工具:Visual C++ Express 2010
影像處理工具:PhotoImpact X3
第一步:前置處理
開啟HelloCpp專案,我們來作一些改造,這次我想要改成480x800的顯示,需要下列步驟進行修改:
main.cpp
#include "main.h"
#include "../Classes/AppDelegate.h"
#include "CCEGLView.h"

USING_NS_CC;

int APIENTRY _tWinMain(HINSTANCE hInstance,
                       HINSTANCE hPrevInstance,
                       LPTSTR    lpCmdLine,
                       int       nCmdShow)
{
    UNREFERENCED_PARAMETER(hPrevInstance);
    UNREFERENCED_PARAMETER(lpCmdLine);

    // create the application instance
    AppDelegate app;
    CCEGLView* eglView = CCEGLView::sharedOpenGLView();
    eglView->setViewName("HelloCpp");
	eglView->setFrameSize(480,800);
    // The resolution of ipad3 is very large. In general, PC's resolution is smaller than it.
    // So we need to invoke 'setFrameZoomFactor'(only valid on desktop(win32, mac, linux)) to make the window smaller.
    //eglView->setFrameZoomFactor(0.4f);
    return CCApplication::sharedApplication()->run();
}
在main.cpp中,修改第23行的內容,參數改為480,800。
eglView->setFrameSize(480,800);
AppMaros.h 部分程式碼
#define DESIGN_RESOLUTION_480X320    0
#define DESIGN_RESOLUTION_1024X768   1
#define DESIGN_RESOLUTION_2048X1536  2
#define DESIGN_RESOLUTION_480X800  3
/* If you want to switch design resolution, change next line */
#define TARGET_DESIGN_RESOLUTION_SIZE  DESIGN_RESOLUTION_480X800

typedef struct tagResource
{
    cocos2d::CCSize size;
    char directory[100];
}Resource;

static Resource smallResource  =  { cocos2d::CCSizeMake(480, 320),   "iphone" };
static Resource mediumResource =  { cocos2d::CCSizeMake(1024, 768),  "ipad"   };
static Resource largeResource  =  { cocos2d::CCSizeMake(2048, 1536), "ipadhd" };
static Resource spResource  =  { cocos2d::CCSizeMake(480,800), "ipad" };

#if (TARGET_DESIGN_RESOLUTION_SIZE == DESIGN_RESOLUTION_480X320)
static cocos2d::CCSize designResolutionSize = cocos2d::CCSizeMake(480, 320);
#elif (TARGET_DESIGN_RESOLUTION_SIZE == DESIGN_RESOLUTION_1024X768)
static cocos2d::CCSize designResolutionSize = cocos2d::CCSizeMake(1024, 768);
#elif (TARGET_DESIGN_RESOLUTION_SIZE == DESIGN_RESOLUTION_2048X1536)
static cocos2d::CCSize designResolutionSize = cocos2d::CCSizeMake(2048, 1536);
#elif (TARGET_DESIGN_RESOLUTION_SIZE == DESIGN_RESOLUTION_480X800)
static cocos2d::CCSize designResolutionSize = cocos2d::CCSizeMake(480, 800);
#else
#error unknown target design resolution!
#endif
新增 #define DESIGN_RESOLUTION_480X800 3 這一行,並且把 TARGET_DESIGN_RESOLUTION_SIZE 設定成 DESIGN_RESOLUTION_480X800
#define TARGET_DESIGN_RESOLUTION_SIZE DESIGN_RESOLUTION_480X800
在17行新增了資源參數(含大小與資源位置)
static Resource spResource = { cocos2d::CCSizeMake(480,800), "ipad" };
在25、26新增解析度尺寸的定義
#elif (TARGET_DESIGN_RESOLUTION_SIZE == DESIGN_RESOLUTION_480X800)
static cocos2d::CCSize designResolutionSize = cocos2d::CCSizeMake(480, 800);
AppDelegate.cpp 的部分程式碼
bool AppDelegate::applicationDidFinishLaunching() {
    // initialize director
    CCDirector* pDirector = CCDirector::sharedDirector();
    CCEGLView* pEGLView = CCEGLView::sharedOpenGLView();

    pDirector->setOpenGLView(pEGLView);
	CCSize frameSize = pEGLView->getFrameSize();

    // Set the design resolution
#if (CC_TARGET_PLATFORM == CC_PLATFORM_WINRT) || (CC_TARGET_PLATFORM == CC_PLATFORM_WP8) || (CC_TARGET_PLATFORM == CC_PLATFORM_ANDROID)
    pEGLView->setDesignResolutionSize(designResolutionSize.width, designResolutionSize.height, kResolutionShowAll);
#else
    pEGLView->setDesignResolutionSize(designResolutionSize.width, designResolutionSize.height, kResolutionNoBorder);
#endif


    vector searchPath;

    // In this demo, we select resource according to the frame's height.
    // If the resource size is different from design resolution size, you need to set contentScaleFactor.
    // We use the ratio of resource's height to the height of design resolution,
    // this can make sure that the resource's height could fit for the height of design resolution.

	searchPath.push_back(spResource.directory);
	pDirector->setContentScaleFactor(MIN(spResource.size.height/designResolutionSize.height, spResource.size.width/designResolutionSize.width));

	/*
    // if the frame's height is larger than the height of medium resource size, select large resource.
	if (frameSize.height > mediumResource.size.height)
	{
        searchPath.push_back(largeResource.directory);

        pDirector->setContentScaleFactor(MIN(largeResource.size.height/designResolutionSize.height, largeResource.size.width/designResolutionSize.width));
	}
    // if the frame's height is larger than the height of small resource size, select medium resource.
    else if (frameSize.height > smallResource.size.height)
    {
        searchPath.push_back(mediumResource.directory);

        pDirector->setContentScaleFactor(MIN(mediumResource.size.height/designResolutionSize.height, mediumResource.size.width/designResolutionSize.width));
    }
    // if the frame's height is smaller than the height of medium resource size, select small resource.
	else
    {
        searchPath.push_back(smallResource.directory);

        pDirector->setContentScaleFactor(MIN(smallResource.size.height/designResolutionSize.height, smallResource.size.width/designResolutionSize.width));
    }
	*/


    // set searching path
    CCFileUtils::sharedFileUtils()->setSearchPaths(searchPath);

    // turn on display FPS
    pDirector->setDisplayStats(true);

    // set FPS. the default value is 1.0/60 if you don't call this
    pDirector->setAnimationInterval(1.0 / 60);

    // create a scene. it's an autorelease object
    CCScene *pScene = HelloWorld::scene();

    // run
    pDirector->runWithScene(pScene);

    return true;
}
這邊只要修改 AppDelegate::applicationDidFinishLaunching() 就可以了。
在第28、29行新增了資源根目錄以及遊戲內的縮放比,主要是為了導入剛剛在AppMarco.h中的設定參數。
searchPath.push_back(spResource.directory);
pDirector->setContentScaleFactor(MIN(spResource.size.height/designResolutionSize.height, spResource.size.width/designResolutionSize.width));
32行至52行,原本有的資源根目錄與縮放比的設定。因為我們在28、29已經設定了,所以可以直接砍掉這一段程式或是在31與53行加入註解符號。
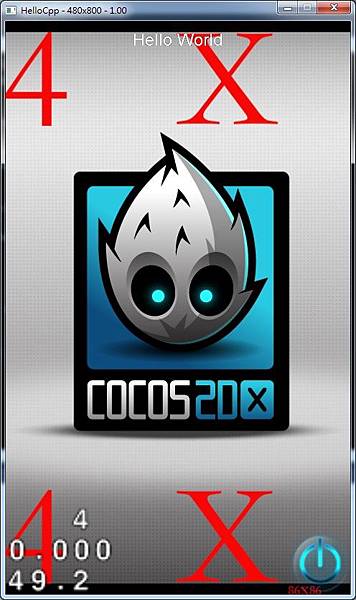
做到這邊,執行一下吧!
第二步:規劃偵測範圍
有一個要注意的點,在Cocos2dx中,座標系使用的是左手系(拇指向內)。因此X方向是往右,Y方向往上,會跟繪圖軟體坐標不太一樣。
下圖是一個日本美女,我們先找到兩塊我們點擊後會觸發抖動範圍的區域,分別為Rect01與Rect02。我們要找的是此區域內的起始座標與寬高,例如Rect01,起始座標是該區域的左下角,X為108,Y為324。Y的324是從影像下方往上屬上來的值喔。
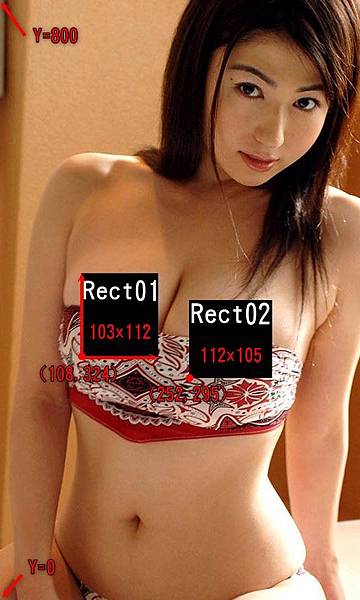
Rect01 :X=108,Y=324,W=103,H=112
Rect02 :X=252,Y=295,W=112,H=105
底圖我們存放在遊戲目錄下的Resource/ipod/下,名稱暫定IMG_GIRL01.jpg

補充說明一下,底圖的尺寸為480x800
第三步:將美女圖載入
接下來,我們要把美女圖Show到遊戲畫面啦,順便也介紹一下CCSprite的使用。
HelloWorldScene.h 完整程式碼
#ifndef __HELLOWORLD_SCENE_H__
#define __HELLOWORLD_SCENE_H__

#include "cocos2d.h"

// 要定義
using namespace cocos2d;

class HelloWorld : public cocos2d::CCLayer
{
public:
    // Here's a difference. Method 'init' in cocos2d-x returns bool, instead of returning 'id' in cocos2d-iphone
    virtual bool init();

    // there's no 'id' in cpp, so we recommend returning the class instance pointer
    static cocos2d::CCScene* scene();

    // a selector callback
    void menuCloseCallback(CCObject* pSender);

    // implement the "static node()" method manually
    CREATE_FUNC(HelloWorld);

	// 增加影像成員
	CCSprite* m_pImgGirl;
};

#endif // __HELLOWORLD_SCENE_H__
第7行,先加入 using namespace cocos2d; 這樣之後新增cocos2d物件時程式碼可以少一點
|
有 using namespace cocos2d; |
無 using namespace cocos2d; |
|
宣告 CCSprite* pImage; |
宣告 cocos2d::CCsprite* pImage; |
[表] 有無using namespace cocos2d;時宣告變數的比較。
第25行,宣告一個CCSprite的指標。
CCSprite* m_pImgGirl;
HelloWorldScene.cpp 部分程式碼
// on "init" you need to initialize your instance
bool HelloWorld::init()
{
    //////////////////////////////
    // 1. super init first
    if ( !CCLayer::init() )
    {
        return false;
    }

    CCSize visibleSize = CCDirector::sharedDirector()->getVisibleSize();
    CCPoint origin = CCDirector::sharedDirector()->getVisibleOrigin();

    /////////////////////////////
    // 2. add a menu item with "X" image, which is clicked to quit the program
    //    you may modify it.

    // add a "close" icon to exit the progress. it's an autorelease object
    CCMenuItemImage *pCloseItem = CCMenuItemImage::create(
                                        "CloseNormal.png",
                                        "CloseSelected.png",
                                        this,
                                        menu_selector(HelloWorld::menuCloseCallback));

	pCloseItem->setPosition(ccp(origin.x + visibleSize.width - pCloseItem->getContentSize().width/2 ,
                                origin.y + pCloseItem->getContentSize().height/2));

    // create menu, it's an autorelease object
    CCMenu* pMenu = CCMenu::create(pCloseItem, NULL);
    pMenu->setPosition(CCPointZero);
    this->addChild(pMenu, 1);

    /////////////////////////////
    // 3. add your codes below...

    // add a label shows "Hello World"
    // create and initialize a label

    CCLabelTTF* pLabel = CCLabelTTF::create("Hello World", "Arial", TITLE_FONT_SIZE);

    // position the label on the center of the screen
    pLabel->setPosition(ccp(origin.x + visibleSize.width/2,
                            origin.y + visibleSize.height - pLabel->getContentSize().height));

    // add the label as a child to this layer
    this->addChild(pLabel, 1);

    // add "HelloWorld" splash screen"
    CCSprite* pSprite = CCSprite::create("HelloWorld.png");

    // position the sprite on the center of the screen
    pSprite->setPosition(ccp(visibleSize.width/2 + origin.x, visibleSize.height/2 + origin.y));

    // add the sprite as a child to this layer
    this->addChild(pSprite, 0);

	//------------------------------------
	// 新增影像物件
	m_pImgGirl = CCSprite::create("IMG_GIRL01.jpg");
	m_pImgGirl->setAnchorPoint(ccp(0,0)); // 座標參考點(左下)
	m_pImgGirl->setPosition(CCPointZero);
	this->addChild(m_pImgGirl,2);

    return true;
}
我們修改一下HelloWorld::init(),在59~62行是初始m_pImgGirl這個物件。
create就是new的意思(但是還有一些相關處理),所以不用特地為m_pImgGirl再new個物件給他了。參數"IMG_GIRL01.jpg"就是傳穎向的路徑與檔名。
m_pImgGirl = CCSprite::create("IMG_GIRL01.jpg");
setAnchorPoint設定錨點,就是設定影像的參考點。參數ccp()是new一個CCPoint的巨集,傳入的參數有兩個,分邊是X軸的位置與Y軸的位置。不過,這邊只能輸入0~1的值。
參數1:左(0)~中(0.5)~右(1.0)
參數2:下(0)~中(0.5)~上(1.0)
所以輸入ccp(0,0),代表設定影像座標時會參考圖片左下
所以輸入ccp(1,1),代表設定影像座標時會參考圖片右上
所以輸入ccp(0.5,0.5),代表設定影像座標時會參考圖片中間
m_pImgGirl->setAnchorPoint(ccp(0,0)); // 座標參考點(左下)
setPosition是設定影像位置,參數也是CCPoint物件,輸入的方式如下:
輸入 CCPointZero :就是輸入原點(0,0)的意思
輸入 ccp(0,0) :也是輸入原點(0,0)
輸入 ccp(100,200) :設定座標在 (100,200)
m_pImgGirl->setPosition(CCPointZero);
以上,是將美女圖的左下角設定在原點0,0的位置。最後一步一定要作的就是要把m_pImgGirl加入至HelloWorldScene的child。沒有加的話,當HelloeWorldScene要進行draw時,不是他的小孩她可是不鳥的註1。addChild參數1就是m_pImgGirl準備要當他小孩的物件啦,參數2則是深度的優先順序,在這個範例用不到,先隨便設定,或是不設定也行。其實還有參數3,是給參數1物件貼一個標籤,這次的範例也用不到。
this->addChild(m_pImgGirl,2);
註1:cocos2dx中,CCSprite是繼承CCNode。該物件有個特性,如果他沒有老爸老媽,他就會被上帝給燒毀!所以m_pImgGirl之所以要認HelloWorldScene為賊父(誤),就是避免被上帝當成孤兒捉去燒毀!
執行一下,看看結果:

第四步:開啟觸碰的功能
接下來要準備寫點東西讓觸碰有反應啦。
HelloWorldScene.h 完整程式碼
#ifndef __HELLOWORLD_SCENE_H__
#define __HELLOWORLD_SCENE_H__

#include "cocos2d.h"

// 要定義
using namespace cocos2d;

class HelloWorld : public cocos2d::CCLayer
{
public:
    // Here's a difference. Method 'init' in cocos2d-x returns bool, instead of returning 'id' in cocos2d-iphone
    virtual bool init();

	// 觸碰控制處理
	void ccTouchesEnded(CCSet* touches, CCEvent* event);

    // there's no 'id' in cpp, so we recommend returning the class instance pointer
    static cocos2d::CCScene* scene();

    // a selector callback
    void menuCloseCallback(CCObject* pSender);

    // implement the "static node()" method manually
    CREATE_FUNC(HelloWorld);

	// 增加影像成員
	CCSprite* m_pImgGirl;
};

#endif // __HELLOWORLD_SCENE_H__
在第16行,加入觸發銀幕反應的宣告,要注意名稱得一模一樣喔!
void ccTouchesEnded(CCSet* touches, CCEvent* event);
HelloWorldScene.cpp 部分程式碼
// on "init" you need to initialize your instance
bool HelloWorld::init()
{
    //////////////////////////////
    // 1. super init first
    if ( !CCLayer::init() )
    {
        return false;
    }

    CCSize visibleSize = CCDirector::sharedDirector()->getVisibleSize();
    CCPoint origin = CCDirector::sharedDirector()->getVisibleOrigin();

    /////////////////////////////
    // 2. add a menu item with "X" image, which is clicked to quit the program
    //    you may modify it.

    // add a "close" icon to exit the progress. it's an autorelease object
    CCMenuItemImage *pCloseItem = CCMenuItemImage::create(
                                        "CloseNormal.png",
                                        "CloseSelected.png",
                                        this,
                                        menu_selector(HelloWorld::menuCloseCallback));

	pCloseItem->setPosition(ccp(origin.x + visibleSize.width - pCloseItem->getContentSize().width/2 ,
                                origin.y + pCloseItem->getContentSize().height/2));

    // create menu, it's an autorelease object
    CCMenu* pMenu = CCMenu::create(pCloseItem, NULL);
    pMenu->setPosition(CCPointZero);
    this->addChild(pMenu, 1);

    /////////////////////////////
    // 3. add your codes below...

    // add a label shows "Hello World"
    // create and initialize a label

    CCLabelTTF* pLabel = CCLabelTTF::create("Hello World", "Arial", TITLE_FONT_SIZE);

    // position the label on the center of the screen
    pLabel->setPosition(ccp(origin.x + visibleSize.width/2,
                            origin.y + visibleSize.height - pLabel->getContentSize().height));

    // add the label as a child to this layer
    this->addChild(pLabel, 1);

    // add "HelloWorld" splash screen"
    CCSprite* pSprite = CCSprite::create("HelloWorld.png");

    // position the sprite on the center of the screen
    pSprite->setPosition(ccp(visibleSize.width/2 + origin.x, visibleSize.height/2 + origin.y));

    // add the sprite as a child to this layer
    this->addChild(pSprite, 0);

	//------------------------------------
	// 新增影像物件
	m_pImgGirl = CCSprite::create("IMG_GIRL01.jpg");
	m_pImgGirl->setAnchorPoint(ccp(0,0)); // 座標參考點(左下)
	m_pImgGirl->setPosition(CCPointZero);
	this->addChild(m_pImgGirl,2);
    //------------------------------------
	// 開啟 Touch 功能
	this->setTouchEnabled(true);
    return true;
}

void HelloWorld::ccTouchesEnded(CCSet* touches,CCEvent* event)
{
	CCTouch* touch = (CCTouch*)( touches->anyObject() );
	CCPoint location = touch->getLocationInView();
	location = CCDirector::sharedDirector()->convertToGL(location);
	CCLog("convertToGLXY  x:%f, y:%f", location.x, location.y);
}
這次一樣也是要小小修改init()函式。在init()函式最後,第65行,我們開啟觸碰銀幕的功能。
this->setTouchEnabled(true);
在69~75行,新增一個ccTouchesEnded(..)。
71行,touch是觸碰反應的訊息物件CCTouch,根據這個物件我們可以得到使用者觸碰的位置資訊。
CCTouch* touch = (CCTouch*)( touches->anyObject() );
72行,藉由CCTouch中的getLocationInView()取得使用者觸碰的座標存到location變數中。此時的座標是我們所知的右手作標系(Y軸越往下越大)。
CCPoint location = touch->getLocationInView();
73行,把銀幕座標轉成cocos2d用的左手座標系座標(往上為大)。
location = CCDirector::sharedDirector()->convertToGL(location);
74行,只是一個Log,會顯示在VC的輸出視窗
CCLog("convertToGLXY x:%f, y:%f", location.x, location.y);
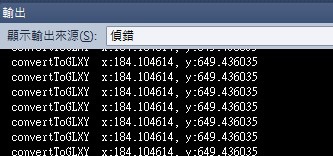
執行一下,隨便點點銀幕,看一下VC的輸入視窗:
第五步:設定偵測範圍
我們再第二步規畫的偵測範圍現在要派上用場啦!
HelloWorldScene.h 全部程式碼
#ifndef __HELLOWORLD_SCENE_H__
#define __HELLOWORLD_SCENE_H__

#include "cocos2d.h"

// 要定義
using namespace cocos2d;

class HelloWorld : public cocos2d::CCLayer
{
public:
    // Here's a difference. Method 'init' in cocos2d-x returns bool, instead of returning 'id' in cocos2d-iphone
    virtual bool init();

	// 觸碰控制處理
	void ccTouchesEnded(CCSet* touches, CCEvent* event);

    // there's no 'id' in cpp, so we recommend returning the class instance pointer
    static cocos2d::CCScene* scene();

    // a selector callback
    void menuCloseCallback(CCObject* pSender);

    // implement the "static node()" method manually
    CREATE_FUNC(HelloWorld);

	// 增加影像成員
	CCSprite* m_pImgGirl;

	CCRect m_oRect01;
	CCRect m_oRect02;
};

#endif // __HELLOWORLD_SCENE_H__
新增兩個成員,用來記錄偵測範圍。
CCRect m_oRect01;
CCRect m_oRect02;
HelloWorldScene.cpp 部分程式碼
// on "init" you need to initialize your instance
bool HelloWorld::init()
{
    //////////////////////////////
    // 1. super init first
    if ( !CCLayer::init() )
    {
        return false;
    }

    CCSize visibleSize = CCDirector::sharedDirector()->getVisibleSize();
    CCPoint origin = CCDirector::sharedDirector()->getVisibleOrigin();

    /////////////////////////////
    // 2. add a menu item with "X" image, which is clicked to quit the program
    //    you may modify it.

    // add a "close" icon to exit the progress. it's an autorelease object
    CCMenuItemImage *pCloseItem = CCMenuItemImage::create(
                                        "CloseNormal.png",
                                        "CloseSelected.png",
                                        this,
                                        menu_selector(HelloWorld::menuCloseCallback));

	pCloseItem->setPosition(ccp(origin.x + visibleSize.width - pCloseItem->getContentSize().width/2 ,
                                origin.y + pCloseItem->getContentSize().height/2));

    // create menu, it's an autorelease object
    CCMenu* pMenu = CCMenu::create(pCloseItem, NULL);
    pMenu->setPosition(CCPointZero);
    this->addChild(pMenu, 1);

    /////////////////////////////
    // 3. add your codes below...

    // add a label shows "Hello World"
    // create and initialize a label

    CCLabelTTF* pLabel = CCLabelTTF::create("Hello World", "Arial", TITLE_FONT_SIZE);

    // position the label on the center of the screen
    pLabel->setPosition(ccp(origin.x + visibleSize.width/2,
                            origin.y + visibleSize.height - pLabel->getContentSize().height));

    // add the label as a child to this layer
    this->addChild(pLabel, 1);

    // add "HelloWorld" splash screen"
    CCSprite* pSprite = CCSprite::create("HelloWorld.png");

    // position the sprite on the center of the screen
    pSprite->setPosition(ccp(visibleSize.width/2 + origin.x, visibleSize.height/2 + origin.y));

    // add the sprite as a child to this layer
    this->addChild(pSprite, 0);

	//------------------------------------
	// 新增影像物件
	m_pImgGirl = CCSprite::create("IMG_GIRL01.jpg");
	m_pImgGirl->setAnchorPoint(ccp(0,0)); // 座標參考點(左下)
	m_pImgGirl->setPosition(CCPointZero);
	this->addChild(m_pImgGirl,2);
	//------------------------------------
	// 設定偵測區間
	m_oRect01.setRect(108,324,103,112);
	m_oRect02.setRect(252,295,112,105);
    //------------------------------------
	// 開啟 Touch 功能
	this->setTouchEnabled(true);
    return true;
}

void HelloWorld::ccTouchesEnded(CCSet* touches,CCEvent* event)
{
	CCTouch* touch = (CCTouch*)( touches->anyObject() );
	CCPoint location = touch->getLocationInView();
	location = CCDirector::sharedDirector()->convertToGL(location);
	CCLog("convertToGLXY  x:%f, y:%f", location.x, location.y);
	//-----------------------------------------------------

	if((m_oRect01.containsPoint(location))||(m_oRect02.containsPoint(location)))
	{
		//先擺著吧,等一下要用來作點道偵測區的反應
		CCLog("Hey! Dont Touch Me!");
	}
}
回到init()中。在第65、66行,進行偵測區間的設定。此時在步驟二測出的參數值可以填入了。使用CCRect的setRect(..),參數1~4分別為座標x、座標y、寬w、高h。
m_oRect01.setRect(108,324,103,112);
m_oRect02.setRect(252,295,112,105);

接下來繼續改ccTouchesEnded(..)。81~85行是用來作銀幕觸碰反應後的處理。
81行,CCRect的containsPoint(..)是用來判斷觸碰點是否有在物件範圍內,簡單來說就是點對區域的碰撞偵測。containsPoint(..)參數就是CCPoint物件,也就是我們觸碰的點。若有碰到,則會回傳true,反之則為false。
if((m_oRect01.containsPoint(location))||(m_oRect02.containsPoint(location)))
84行,如果有碰觸到Rect01或是Rect02其中一個,就會進到這個if()裡面。我們準備要寫的就是執行抖動的反應,後續會繼續介紹。我們先加個Log來看我們有沒有寫對啊!
CCLog("Hey! Dont Touch Me!");
執行一下,點級我們設定的區域,看看輸出視窗:

第六步:使用CCRipple3D,讓美女波濤洶湧吧!
走到這,終於要使出最關鍵的一招了,就是呼叫CCRipple3D來讓CCSprite給動起來啊!
HelloWorldScene.cpp 部分程式碼
void HelloWorld::ccTouchesEnded(CCSet* touches,CCEvent* event)
{
	CCTouch* touch = (CCTouch*)( touches->anyObject() );
	CCPoint location = touch->getLocationInView();
	location = CCDirector::sharedDirector()->convertToGL(location);
	CCLog("convertToGLXY  x:%f, y:%f", location.x, location.y);
	//-----------------------------------------------------
	CCSize Swin = CCDirector::sharedDirector()->getWinSize();

	if((m_oRect01.containsPoint(location))||(m_oRect02.containsPoint(location)))
	{
		CCLog("Hey! Dont Touch Me!");
		if(m_pImgGirl->numberOfRunningActions()==0)
		{
			CCActionInterval* pAction = CCRipple3D::create(0.3, CCSizeMake(30,30), location, 80, 1, 180);
			m_pImgGirl->runAction(pAction);
		}
	}
}
繼續修改ccTouchesEnded(..)。我們在13~17行加入執行CCRipple3D的程式碼。
13行,我們希望每次執行CCRipple3D至多只有一組。這個判斷就是說若CCRipple3D還在執行,就不鳥了。
if(m_pImgGirl->numberOfRunningActions()==0)
15行,進行CCRipple3D的create。因為CCRipple3D也是Action的一種,所以使用CCActionInterval的指標去接CCRipple3D new出來的物件。create CCRipple3D的參數有6個。整理如下:
參數1:執行時間,時間越短,反應速度越快。(秒)
參數2:Ripple範圍,所以要輸入寬高尺寸(CCSize)。
參數3:觸發位置(CCPoint)。
參數4:半徑
參數5:幾個波
參數6:波的強度
CCActionInterval* pAction = CCRipple3D::create(0.3, CCSizeMake(30,30), location, 80, 1, 180);
16行,還記得美女圖的變數m_pImgGirl嗎?現在要執行runAction(..)讓Ripple跑起來嚕!
m_pImgGirl->runAction(pAction);
執行一下,看看會不會有感動呢:
第七步:優化
作到剛剛,已經有效果跑出來了。但是有沒有發現怪怪的!跑完就回不去了耶!所以接下來就是要收尾,把怪怪的感覺優化一下。
HelloWorldScene.h 完整程式碼
#ifndef __HELLOWORLD_SCENE_H__
#define __HELLOWORLD_SCENE_H__

#include "cocos2d.h"

// 要定義
using namespace cocos2d;

class HelloWorld : public cocos2d::CCLayer
{
public:
    // Here's a difference. Method 'init' in cocos2d-x returns bool, instead of returning 'id' in cocos2d-iphone
    virtual bool init();

	// 增加建構子
	HelloWorld();

	// 行為迴圈處理
	void run(float dt);

	// 觸碰控制處理
	void ccTouchesEnded(CCSet* touches, CCEvent* event);

    // there's no 'id' in cpp, so we recommend returning the class instance pointer
    static cocos2d::CCScene* scene();

    // a selector callback
    void menuCloseCallback(CCObject* pSender);

    // implement the "static node()" method manually
    CREATE_FUNC(HelloWorld);

	// 增加影像成員
	CCSprite* m_pImgGirl;

	CCRect m_oRect01;
	CCRect m_oRect02;
};

#endif // __HELLOWORLD_SCENE_H__
16行,宣告建構子
HelloWorld();
19行,宣告run(..),用來在跑遊戲迴圈。參數一定要float格式。
void run(float dt);
HelloWorldScene.cpp 部分程式碼
HelloWorld::HelloWorld()
{
	m_pImgGirl = NULL;

	scheduleUpdate();
	schedule(schedule_selector(HelloWorld::run));
}

void HelloWorld::run(float dt)
{
	// check ripple. If action is finish, recover the image.
	if(m_pImgGirl!=NULL)
	{
		if(m_pImgGirl->numberOfRunningActions()==0 && m_pImgGirl->getGrid()!=NULL)
		{
			m_pImgGirl->setGrid(NULL);
		}
	}
}
新增實作HelloWorldScene建構子與run(..)
以上七個步驟,就可以完成這血脈噴張的功能啦!





 留言列表
留言列表
 {{ article.title }}